How to Reroot A Snake Plant With Simple Steps
Written by Ivy
Dec 28 2022

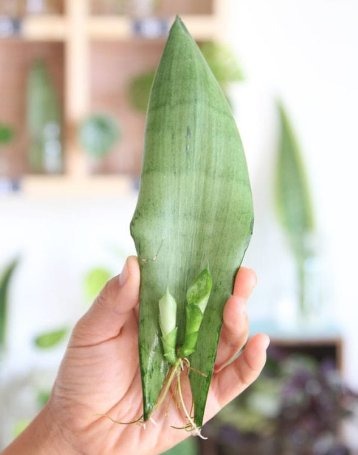
If you continuously grow a snake plant in low light, its leaves will eventually grow lanky and fall over. A friend of mine who I had left in the living room's corner next to the couch experienced this. I cut off two of the floppy leaves because I was sick of looking at the same old mess. After rooting them, I now have three plants.
Overview to Reroot a Snake Plant
- Cut off a leaf close to the soil line with a sharp knife.
- The cut leaf should be left out on a table or counter for a few days. As a result, the cut end can recover before it touches the ground. The leaf might rot if you skip this step.
- Place the cut end in a pot with wet potting soil. No need for rooting solution! The pot needs to have a saucer, a drainage hole, and be tall enough to prevent being pulled over by the leaf.
- Water the soil once or twice a week for two to three weeks to keep it moist. Always drain any extra water from the saucer.
- Soon, new leaves will start to appear from the ground. From then on, take care of the new plant as you did the mother plant.
How to Reroot a Snake Plant
Step 1: Supplies
- A clean pot & saucer- appropriate for the size of your leaves*
- Utility scissors or garden sheers
- Perlite
- Peat moss or vermiculite
- Container to mix the two soil ingredients
- Big wooden spoon
Step 2: Make a Clean Cut!
Cut the bottoms of the leaves off well above the "melty" and yellowed ends to say goodbye to the rotten ends. It looks like a healthy section, so you want to cut straight across it.
I made the decision to keep my leaves on for as long as possible in order to maintain the "look" of a snake plant as it tries to take root. Cut them even shorter if you prefer to err on the side of caution.
In spite of the fact that there is no way to know if a fungus or bacteria has entered the plant's system as a result of the rot, I always believe it is worth trying to save it. If it doesn't work, then I'll toss it and buy a new one.
Before continuing, let your cut leaves sit for 24 hours to callus over. As cinnamon is an anti-fungal, you can also sprinkle a little of it on the ends if you have any on hand.

Step 3: Mix Your Mix
Now combine 2-3 cups of each perlite and peat moss (50/50) in a mixing bowl. Perlite will provide good aeration, and peat will hold some moisture without becoming overly so. (No more of the rot, please...) Just hazard a guess; don't worry about making too much. Everything that is left over can always be saved and used for future plant-related ventures.
Pour in just enough water to lightly moisten the mixture without making it wet during caring for the snake plant.
Step 4: Fill & Plant
Spoon the mix into your pot to about 3/4" below the rim. Use the back of your spoon to gently press your snake plant down.
Take each leaf and gently press it into the mixture until it stands up on its own. Use your fingers to gently press the mixture around the leaf bases.
Put the pot in a warm location with good, but indirect light in your home once all the leaves have been inserted. (Use a window that faces north.) Don't let the mixture become sopping wet. The roots will shrivel and die if the environment is too dry, but too much water is also bad. Utilize your common sense and testing finger!
Finally, clasp your hands and offer a brief prayer to the plant deities. Each leaf will take root (and eventually develop into its own distinct plant) if the propagation is successful in about 4-6 weeks. You can check them by very gently pulling on the leaves to see if there is resistance.
As soon as they begin to establish roots (think positively!), they will eventually start growing new leaves. You will then need to disassemble your "fake" arrangement of rescue plants and move each new cluster into its own pot.
FAQs
How to Cut Snake Plant Leaves
The potting soil must be moist for snake plant cuttings to take root. First, remove a leaf from an established plant, cutting the leaf at the base of the plant with pruners or a knife. Cutting the leaf into 2-inch pieces horizontally will increase the number of new plants.
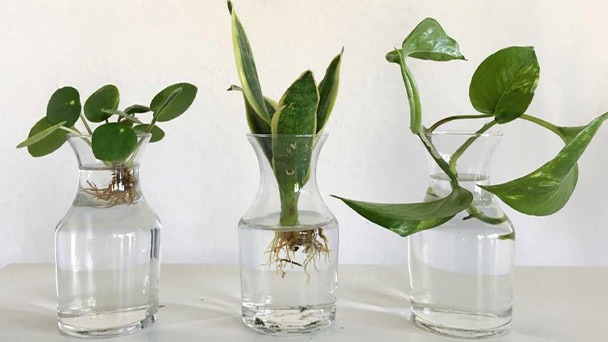
Can I Propagate Snake Plant in Water?
Snake plants can indeed be propagated in water. However, it may take a while, result in rot, and the young often have a more difficult time returning to the soil.
Although it may take some time, growing snake plants is very simple. A single Sansevieria leaf can yield several new plants, giving you plenty to enjoy and give to loved ones.
Can You Replant a Snake Plant Without Roots?
Luckily, you can regrow the snake plant through propagation by doing the following: removing the damaged ends and trimming. Making a potting mix with peat moss and perlite. Applying an antifungal (like cinnamon) to the leaves.Can You Replant Broken Snake Plant?
Damaged Snake Plant leaves can't truly heal, but if you slice them off and replant them, they can grow into new plants.How Long Does It Take for a Snake Plant to Root in Water?
For the plant to sit in water without touching the bottom and have room to grow roots, use a cup, jar, or other suitable container. It is not necessary to immerse the entire structure in water. Then, you want to wait four to six weeks until you see the roots growing.Read more about snake plants!
- How to Get a Snake Plant to Bloom with Simple Ways
- Is Snake Plant Poisonous to Cats - How to Prevent
- What Are the Benefits of Snake Plants - Everything You Need to Know
- How Much Light Does Snake Plant Need
- How Often to Water Snake Plant (Sansevieria Trifasciata)
- How To Fix Snake Plant Root Rot (Sansevieria Trifasciata)
- Underwatered Snake Plant (Sansevieria Trifasciata) - Signs And How To Fix
- How To Save Overwatered Snake Plant (Sansevieria Trifasciata)
Latest Updated
- Benefits of Bugleweed - 7 Science-backed Health Benefits
- Bugleweed Dangers & Side Effects - Is It Poisonous?
- How to Plant Evergreen Trees - What You Should Know
- When to Plant Evergreens - Grow Guide for Evergreen Trees
- 12 Wonderful Evergreen Shrubs for Your Garden
- 12 Popular Evergreen Plants with Pictures for Beginners
- When And How To Prune A Lilac Bush Like a Pro
- How to Grow & Care for Lilac Vine (Hardenbergia Violacea)
- Japanese Lilac Tree (Syringa Reticulata) Care & Propagation Guide
- Shumard Oak Pros and Cons - What to Know
Popular Articles
- Winter maintenance of Antirrhinum Majus
- How to Grow Terminalia Mantaly Tree
- How to Grow and Care for Crossostephium Chinense
- How to grow Antirrhinum Majus in spring
- Peristeria Elata (Dove Orchid) Profile: Info & Care Guide
- Underwatered Snake Plant (Sansevieria Trifasciata) - Signs And How To Fix
- How to Care for Brazilian Jasmine Plant (Mandevilla Sanderi)
- How to Grow & Care for Graptopetalum Purple Delight in Summer
- Rosa Chinensis (China Rose): Plant Growing & Care Tips
- How to Care for Baby Sun Rose (Aptenia Cordifolia)